

How To Make Killing Floor As Your Desktop Background
Instructions
Before starting with anything that is beneath this Section. Pay attention to where the Config files are located, nosotros will NOT make whatever changes to the "DefaultXXX.ini" files.
And this is for two main reasons:
ane. The Default .ini files will be reset every update there is to Killing Floor ii because the game thinks something is missing / got replaced, so steam will download the .ini files into your SteamApps folder.
2. You lot tin can easily revert to your previous settings if something is screwed up.
three. If you have any trouble with the commands missing or performance issues try deleting the .ini files and let Steam re-download them in order to make sure everything is working as intended.
For better understanding I will tell yous in every single section where the .ini file is located and which of the .ini files you demand to edit.
Every modify we make in this [Guide] will be in the same folder every bit followed:
C:\Users\[Your Computer Name]\Documents\My Games\KillingFloor2\KFGame\Config
The following .ini files are edited in this [Guide]:
- KFEngine.ini
- KFGame.ini
- KFSystemSettings.ini
This [Guide] can be used to either better your FPS or make the game look more fancy! Depending on what y'all like to do. Just Increase/Decrease or Enable/Disable settings in those .ini's
Unlocking FPS cap
Before starting annihilation yous should remove the FPS cap of 60 FPS
Go to the following folder:
C:\Users\[Your Computer Name]\Documents\My Games\KillingFloor2\KFGame\Config
Open up file "KFEngine.ini" with Notepad or Notepad++ and apply Ctrl+F for searching. Search for:
bSmoothFrameRate
Change the following values to your preferences below:
bSmoothFrameRate=FALSEMinSmoothedFrameRate=22
MaxSmoothedFrameRate=144
Note: These commands appear twice in this .ini file and should exist changed.
- bSmoothFrameRate Smoothing the Frame Rate yes or no set to Faux to unlock.
- MinSmoothedFrameRate Min. Frame Charge per unit leave as default.
- MaxSmoothedFrameRate Max. Smoothed Frame Rate for example equally shown above 144 for a 144Hz monitor.
Notation in that location seems to be another "SmoothFrameRate" Command in the "KFGame.ini" which incase your framerate is not unlocked (Should exist due to the fact there is a slider in-game) should be changed likewise, to do so open up "KFGame.ini" and do the same steps as nosotros did in the "KFEngine.ini" above. - Thanks to Dobes for finding the third control.
Improve PhysX Flex
Some PhysX Flex settings (GeForce 970 and in a higher place but!)
Go to the following binder:
C:\Users\[Your Estimator Name]\Documents\My Games\KillingFloor2\KFGame\Config
Open file "KFSystemSettings.ini" with Notepad or Notepad++ and use Ctrl+F for searching. Search for:
FlexInvisibleFramesBeforeSleep
Change the following values to your preferences below:
FlexInvisibleFramesBeforeSleep=threescoreFlexDistanceBeforeSleep=1500.000000
AllowSPHFluidMipmap=True
FlexRigidBodiesCollisionAtHighLevel=Simulated
- FlexInvisibleFramesBeforeSleep Invisibility of the 'Fluid/Blood' before disappearing. (fade out time)
- FlexDistanceBeforeSleep Distance before the fluid stops moving for yous.
- AllowSPHFluidMipmap Permit the 'Fluid/Blood' to take the mipmap.
- FlexRigidBodiesCollisionAtHighLevel Enable/Disable body parts to collied with other body parts.
Disclamer:
PhysX Flex has been re-enabled as of 14/4/2016 and marked as "Stable" past the Developers.
Improve Sound Quality and possible audio stutter fix
Now lets improve your Audio Quality in the game for a much richer enviroment.
Go to the post-obit binder:
C:\Users\[Your Computer Proper name]\Documents\My Games\KillingFloor2\KFGame\Config
Open file "KFEngine.ini" with Notepad or Notepad++ and employ Ctrl+F for searching. Search for:
[XAudio2.XAudio2Device]
Change the following values to your preferences beneath:
MaxChannels=32CommonAudioPoolSize=0
- MaxChannels tells the game how many sound channels information technology uses to play sounds. 32 works on bulk of even crap Sound Cards merely some can do more. My Asus Xonar Essence STX supports up to 128 channels.
This ways for you in-game the scenery becomes more than... well Alive due to the fact that more audio can be played at the same time.
Following Values tin can exist assigned to MaxChannels:
- 16
- 32
- 48
- 64
- 96
- 128
If you lot get some weird noises in the game try lowering this value once again and run into what works all-time for you.
- CommonAudioPoolSize is the amount of retentiveness to reserve for always resident sounds, or in other words the amount of pre-buffered sound in your memory so it is instantly set when it is required.
Following Values can be assigned to CommonAudioPoolSize
- 32
- 64
- 128
- 256
You can try different values of class
This should too potentially gear up sound stuttering issues. Considering of the sound beingness pre-buffered.
Improve Shadow/Reflection Quality
Drastically meliorate your Shadow Quality
Note: Only use if your boilerplate FPS in-game is 80 and higher up!
Go to the following folder:
C:\Users\[Your Computer Name]\Documents\My Games\KillingFloor2\KFGame\Config
Open file "KFSystemSettings.ini" with Notepad or Notepad++ and use Ctrl+F for searching. Search for the following one by one:
MaxShadowResolution
MaxWholeSceneDominantShadowResolution
UseHighQualityReflections
bEnableForegroundShadowsOnWorld
bEnableForegroundSelfShadowing
MinShadowResolution
MaxDrawDistanceScale
MinPreShadowResolution
MobileShadowTextureResolution
UnbuiltNumWholeSceneDynamicShadowCascades
ShadowFadeExponent
WholeSceneShadowCutoffDistance
WholeSceneShadowFadeOutDistance
GlobalShadowDistanceScale
Change the following values to your preferences below: (Values may differ from yours)
MaxShadowResolution=1024MaxWholeSceneDominantShadowResolution=1280
UseHighQualityReflections=Faux
bEnableForegroundShadowsOnWorld=Simulated
bEnableForegroundSelfShadowing=False
MaxDrawDistanceScale=1.0
MinShadowResolution=64
MinPreShadowResolution=24
MobileShadowTextureResolution=1280
ShadowFadeResolution=64
PreShadowFadeResolution=16
UnbuiltNumWholeSceneDynamicShadowCascades=9
ShadowFadeExponent=0.5
WholeSceneShadowCutoffDistance=1400
WholeSceneShadowFadeOutDistance=1200
GlobalShadowDistanceScale=1.v
- MaxShadowResolution The max. Shadow resolution.
- MaxWholeSceneDominantShadowResolution Shadow Resolution for the whole scenery.
- UseHighQualityReflections Allow of Loftier Quality Reflection.
- bEnableForegroundShadowsOnWorld Enable your characters shadow on world Objects
(Equally of current non recommended, will show only your artillery, hands and weapons.)
- bEnableForegroundSelfShadowing Enable shadows existence rendered on your Arms, Hands and Weapons.
Thanks to
🐏 Dobes! 🐶for finding a couple more commands for the Shadows.
Amend Reflection Quality
Drastically improve your Reflection Quality
Notation: Only use if your average FPS in-game is eighty and above!
Go to the following binder:
C:\Users\[Your Computer Name]\Documents\My Games\KillingFloor2\KFGame\Config
Open file "KFEngine.ini" with Notepad or Notepad++ and use Ctrl+F for searching. Search for:
ImageReflectionTextureSize
Change the following values to your preferences below:
ImageReflectionTextureSize=1024
- ImageReflectionTextureSize The Texture size of the Reflection on objects
Example of what it can be set to:
ImageReflectionTextureSize=4096Thanks to 🐏 Dobes! 🐶 for finding this command line!
Improve Texture Quality
Drastically improve your Texture Quality!
Note: But use if your average FPS in-game is eighty and above!
Become to the post-obit binder:
C:\Users\[Your Computer Name]\Documents\My Games\KillingFloor2\KFGame\Config
Open file "KFSystemSettings.ini" with Notepad or Notepad++ and find following commands:
These lines are nearly the superlative yous tin't miss them.
Notepad++ lines 181 - 207
(Might differ from yours)
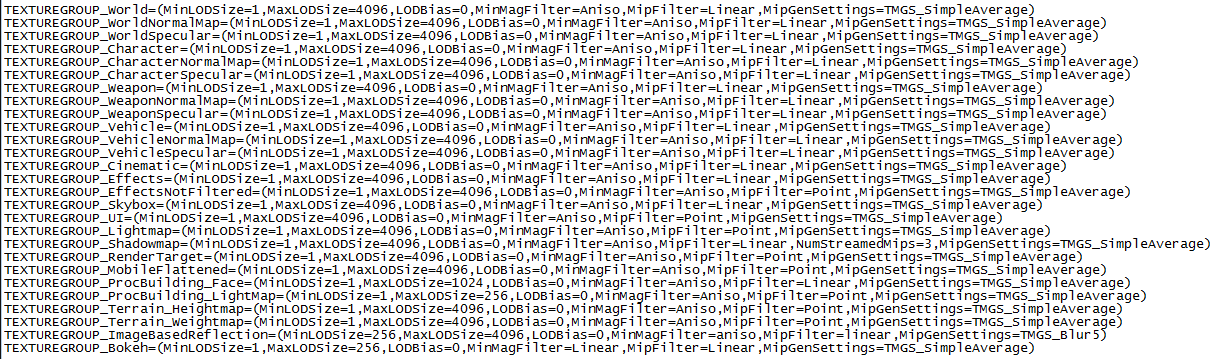
In these lines you will discover all the texture resolutions from the game.
Edit the following to increase the Texture Resolution:
Each individual line which got "MaxLODSize=XXXX" in information technology.
Alter the "XXXX" to "4096".
(Without the " ")
Note: The lines:
- TEXTUREGROUP_ProcBuilding_Face[...]MaxLODSize=4096
- TEXTUREGROUP_ProcBuilding_LightMap[...]MaxLODSize=2048
Are jump aswell by "KFEngine.ini's" commands:
- MaxProcBuildingLODColorTextureSize=4096
- MaxProcBuildingLODLightingTextureSize=2048
So in club to have them work properly you have to ready the size of the texture the same as the ane you ready in the "KFSystemSettings.ini" file
(Thanks to
for pointing this out.)
A little bit further down are a few more lines
(Don't ask me why they are not together)
Which we will edit aswell same as above.
Notepad++ lines 247 - 254

So one more time.
Each private line which got "MaxLODSize=XXXX" in information technology.
Change the "XXXX" to "4096".
(Without the " ")
--------------------------------------------------------------------------------------------------------------------------
/////////////////////////////////////////////////////////////////////////////////////////////////////////////////////////////////////////////////////////
--------------------------------------------------------------------------------------------------------------------------
Edit:
Again go to the following folder:
C:\Users\[Your Computer Proper noun]\Documents\My Games\KillingFloor2\KFGame\Config
Open file "KFSystemSettings.ini" with Notepad or Notepad++ and search following commands:
SkeletalMeshLODBias=0
ParticleLODBias=0
and modify the "0" to "-5" to go higher quality Models/Particles.
Thank you to Vlad for finding these!
--------------------------------------------------------------------------------------------------------------------------
/////////////////////////////////////////////////////////////////////////////////////////////////////////////////////////////////////////////////////////
--------------------------------------------------------------------------------------------------------------------------
Another control for how far you can see these loftier quality Models is in the "KFGame.ini"
C:\Users\[Your Figurer Name]\Documents\My Games\KillingFloor2\KFGame\Config
Open file "KFGame.ini" with Notepad or Notepad++ and search following commands:
MeshLODRange=0
Modify the "0" to "-five" so you tin can see the high quality Models/Particles further away from y'all.
Thanks to Dobes for finding this!
Improve Texture Streaming
Now you got college resolution textures and shadows better the Texture Streaming!
Different other people may tell you to disable Texture Streaming completely, I am telling you to keep it on and improve it.
Go to the following folder:
C:\Users\[Your Computer Name]\Documents\My Games\KillingFloor2\KFGame\Config
Open file "KFEngine.ini" with Notepad or Notepad++ and use Ctrl+F for searching. Search for:
TextureStreaming
Change the following values to your preferences below: (Values may differ from yours)
PoolSize=3072MemoryMargin=768
- PoolSize the max. VRAM of your GPU in MB.
- MemoryMargin corporeality of MB to reserve for new Textures incoming, should exist 10-20% of your VRAM.
Possible Values can be set for PoolSize:
- 1GB = 1024 = MemoryMargin=128
- 2GB = 2048 = MemoryMargin=256
- 3GB = 3072 = MemoryMargin=768
- and so on
If you experience Textures popping up, make the Streaming organization a piddling bit more aggressive.
In "KFEngine.ini" search the following commands: (Values may differ from yours)
MipFadeInSpeed0=0.twoMipFadeOutSpeed0=0.1
MipFadeInSpeed1=ane.0
MipFadeOutSpeed1=0.5
- MipFadeInSpeed0 Mipmap fade-in time for when yous are in First-Person-Style.
- MipFadeOutSpeed0 Mipmap fade-out time for when you lot are in Starting time-Person-Way.
- MipFadeInSpeed1 Mipmap fade-in time for when you are in Spectator fashion or you are dead.
- MipFadeOutSpeed1 Mipmap fade-out time for when yous are in Spectator mode or you are dead.
Attempt lowering the values by your liking these settings are in Seconds. Lowering them all to 0.0 will result in Texture Streaming non working Properly.
The above listed values are tested past myself and work perfectly.Another setting in the same .ini file which might be a possible set up for people using SLI.
Fixed Textures pop-up for my test setup with two GTX970
Open file "KFEngine.ini" with Notepad or Notepad++ and use Ctrl+F for searching. Search for:
MemoryPools
FLightPrimitiveInteractionInitialBlockSize=2048FModShadowPrimitiveInteractionInitialBlockSize=2048
- FLightPrimitiveInteractionInitialBlockSize These two values should be set up to around ten-20% of your availabe RAM.
- FModShadowPrimitiveInteractionInitialBlockSize
If you disabled Texture Streaming already, enable information technology once more
In the same .ini file seach for:
bUseTextureStreaming
and change its value again to "Truthful"
For a GPU with 3GB VRAM you lot can utilize the settings upward there.
Disable Texture Streaming (At your Own Take chances)
The post-obit might intermission your Game, some people say it is helping and other people say it works amend.
Due to a request in the comment section here the way to disable Texture Streaming completely.
Go to the following binder:
C:\Users\[Your Computer Name]\Documents\My Games\KillingFloor2\KFGame\Config
Open file "KFEngine.ini" with Notepad or Notepad++ and use Ctrl+F for searching. Search for:
bUseTextureStreaming
bUseBackgroundLevelStreaming
Notation: the same command tin can be found in "KFGame.ini" which you need to alter aswell.
AllowStreamingLightmaps
UsePriorityStreaming
UseDynamicStreaming
- bUseTextureStreaming Only ways the textures are being loaded whenever they are needed.
- bUseBackgroundLevelStreaming This setting is related to the streaming textures in the game, and appears to control whether streaming occurs in the background or non.
- AllowStreamingLightmaps Streaming the Lightmaps yes or no.
- UsePriorityStreaming Basically telling the engine to prioritize the Streaming system.
- UseDynamicStreaming Dynamically Stream the textures every bit you move around the level.
Just remove the "True" and replace information technology to "False" this disables the Texture Streaming.
(Without the " ")
**Note:
Make sure you have a High-End GPU with a minimum 6GB VRAM, tested by a couple of people including myself without problems, yet information technology might crusade some problems for your setup. So be mindful of what you lot exercise and if it does not piece of work just become back by turning information technology dorsum on.
More Gore and Dead Bodies
Don't set up the following values to loftier, or you'll risk crashing the game.
Go to the post-obit folder:
C:\Users\[Your Computer Name]\Documents\My Games\KillingFloor2\KFGame\Config
Open file "KFGame.ini" with Notepad or Notepad++ and use Ctrl+F for searching. Search for:
[KFGame.KFGoreManager]
Change the following values to your preferences below: (Values may differ from yours)

- MaxImpactEffectDecals Max amount of impact Decals on Objects (Bulletholes, Melee Cuts)
- GoreFXLifetimeMultiplier Controls how long Gibs and Gore stay before vanishing.
- BodyWoundDecalLifetime Value for the lifetime of bullet impacts/holes.
- BloodSplatterLifetime Value for the lifetime of the splatters on the ground/walls.
- BloodPoolLifetime Value for the lifetime of blood pools.
- GibletLifetime How long it will take before Giblets disappear.
- MaxBodyWoundDecals How many "wounds" Decals are applied to Enemies.
- MaxBloodSplatterDecals Value for the lifetime referring to private decals/textures in one splatter.
- MaxBloodPoolDecals How many blood pools you can have generated at once.
- BloodSplatSize Size of a splatter. (Don't put it to high)
- BloodPoolSize Size of a blood pool. (Same equally to a higher place)
- MaxDeadBodies Max corporeality of Ragdolls (Corpses) earlier they starting time to vanish.
Annotation: There's no Timer on Ragdolls, they stay forever just are limited by the above amount. - MaxBloodEffects Max corporeality of Blood Effects.
- MaxGoreEffects Max amount of Gore/severed Body Parts at the same time before they start to vanish.
- AllowBloodSplatterDecals Enables additional non-permanent Blood Splat decals.
- PersistentSplatTraceLength The length the Splats go.
- MaxPersistentSplatsPerFrame Controls how many permanent Blood Splats are allowed per one Frame.
- bAllowBloodSplatterDecals Allowing extra Splatter Decals.
At present prepare the values to your liking and figure out what works best for you!
Increase Decal Life Span
Now that you have more Blood and Gore yous want the Decals to stay longer aswell.
Go to the following folder:
C:\Users\[Your Computer Name]\Documents\My Games\KillingFloor2\KFGame\Config
Open file "KFGame.ini" with Notepad or Notepad++ and utilize Ctrl+F for searching. Search for:
[Engine.DecalManager]
Change the values to your preferences below:
DecalLifeSpan=10.0- DecalLifeSpan Sets how long Decals stay for in Seconds.
Gear up the above number to how always long you desire your Decals to stay.
QUAKE like Field Of View
Adjust the FOV for a QUAKE like experience
Go to the post-obit binder:
C:\Users\[Your Computer Name]\Documents\My Games\KillingFloor2\KFGame\Config
Open up file "KFEngine.ini" with Notepad or Notepad++ and use Ctrl+F for searching. Search for:
[Engine.LocalPlayer]
Modify the following control:
AspectRatioAxisConstraint=AspectRatio_MaintainXFOVto
AspectRatioAxisConstraint=AspectRatio_MaintainYFOV- AspectRatioAxisConstraint=AspectRatio_MaintainXFOV Changing your FOV from Vertical- to Horizontal+
FOV explained for better understanding what Vert- and Hor+ really means and does.
- The first mode is called "Vert-" , which indicates that the vertical angle is reduced in 16:9/xvi:10 screens compared to four:three screens. So for case:
Playing in 1920x1080 (16:9) would employ the 90 degrees horizontally, and information technology would calculate a vertical FOV of effectually 59 degrees vertically, which is less than the 74 degrees yous would have in a 4:three screen. - The 2nd way is called "Hor+" , which indicates the horizontal angle is increased in sixteen:9/xvi:10 screens compared to iv:3 screens. Then for instance:
Playing in 1920x1080 (16:9) will use the 90 degrees horizontally, and will calculate a vertical FOV of around 106 degrees vertically, which is more the 74 degrees you would have in a 4:iii screen.
For better understanding here is a elementary picture to bear witness how information technology is affecting your Game.

Please keep in mind that this change of FOV is optional and not necessary, it will requite you more to see only it will requite the game a more of a Quake similar feeling with a slight fisheye view effectually the edges. So only modify this if you similar it.
Here are some Screenshots of the change in the actual game!
Vert- Settings


Hor+ Settings


Skip Intro Movies
Make Killing Flooring ii Outset-up faster
To skip all intro movies simply go to:
Your Steam Library and Select Killing Floor 2
Right click onto Killing Floor 2 then the Extra Options show up
Select "Properties" and in there select "Gear up Launch Options..."
Simply put this command "-nostartupmovies" in and Select "Ok" so "Close" and Enjoy your Killing Floor 2 without whatsoever of the intro movies.
Submitted Fixes
Texture Pop-Up possible Solution
At that place has been a problem with Textures Popping up in the game while walking effectually corners and such.
There is a Solution to this, simply unlock your Framerate and disable VSync in-game.
This especially occured while using
.
While a single GPU might be happy with some of the settings in the department:
[Improve Texture Streaming]
Thank you to - Sandman Eh Docholiday332 - for his trial and error run with those settings.
DxTory game crash ready
Ok I've had this problem quite awhile now and I found a set up for this issue here is how
Fix for DxTory version two.0.130 and upwards
For everyone out there if you take DxTory version two.0.130 installed and your game crashes on offset upwards simply select a Delay Hook of ~7 seconds. How?
Go to the "Avant-garde" Tab in DxTory and under "Claw Pick" tick the "Delay Hook" box and ready a timer of around seven seconds or more depending on when your game stops crashing.
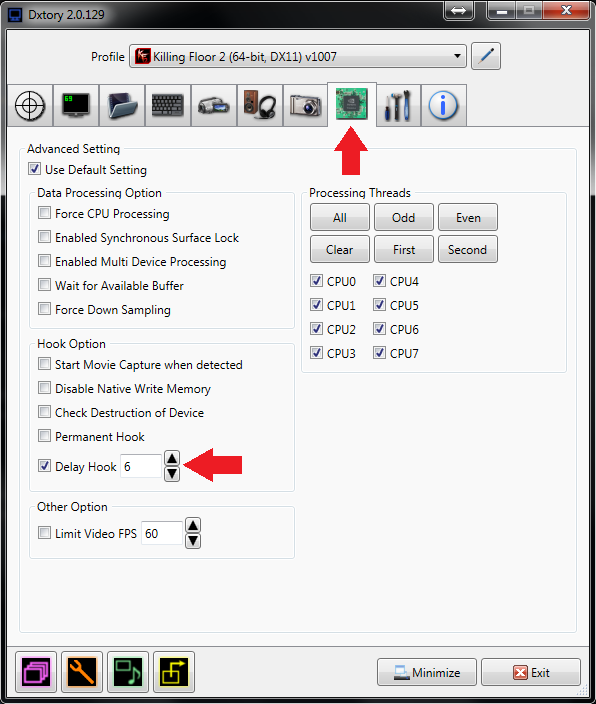
what this basically does is setting a Delay in seconds to claw to the game. Significant it will give the game fourth dimension to outset-upward earlier it starts showing you the FPS counter.
PS.: This prepare works for all Games out there who are crashing on start-up with DxTory running.
It however does not work if you take any SweetFX or ReShade mod running with your game.
Updates
//Updated// 02/09/2015
'Incinerate 'N Detonate Update'- Added PhysX Flex settings!
- Updated some contents
//Updated// 29/03/2016
- Update on PhysX Flex Delight read!!
- Added information about DxTory
- Added possible gear up for SLI / Crossfire Texture Pop-Up (Cheers to Sandman Eh Docholiday332 )
//Updated// 08/05/2016
- Re-added PhysX Flex tweaks
- Added some more content (Thanks to Dobes )
- Edited some contents
//Updated// 25/08/2016
- Added Section for:
Noteworthy user Guides
//Updated// 05/01/2017
- Added some more commands to the [Guide]
//Updated// 05/01/2017
- Added some more commands in
Amend Texture Quality
Last Words
I will add together more tweaks and Improvements to this guide as Killing Floor 2 Develops and gets more features.
I hope you enjoyed my guide on how to Improve your Killing Floor ii experience.
If I fixed any of your bugs or issues you were having with the game please permit me know in the comments beneath and so I tin can add this to the Guide.
If you need help with anything feel free to annotate aswell.

How To Make Killing Floor As Your Desktop Background,
Source: https://steamcommunity.com/sharedfiles/filedetails/?id=440503910
Posted by: broomfife1996.blogspot.com
0 Response to "How To Make Killing Floor As Your Desktop Background"
Post a Comment