

How To Remove Background Photoshop Magic Wand
Magic Wand Tool Photoshop uses to select any part of an image to supervene upon, remove or edit.
Practice you need to apply Photoshop in your day-to-day life? If the answer is Yes, you might have heard of the Magic Wand Tool and already used it.
Using the Magic Wand Tool, you can hands select any part of a photo. And brand a background transparent within a few seconds.
In improver, the magic wand tool is a handy tool in Photoshop for selection to replace or remove the background.
The magic wand tool is categorized as a Selection Tool in Photoshop. This tool will assistance you in selecting specific areas of an image and editing it independently. The magic wand tool uses for selecting solid backgrounds or any other colored area.
However, it doesn't show a disarming functioning in an image with a dissimilar slope or obscure feature.
You lot can conveniently replace or remove the background with the magic wand tool without changing the subject. Production photography and eCommerce shots are the areas where the magic wand tool is extensively used.
The pixel option process of a magic wand tool is entirely different to a Quick Choice tool. Based on a like colour and tone, it selects pixels.
The magic wand tool doesn't search for individual borders; information technology looks for a similar colour canvas to complete its choices.
Magic Wand Tool will give the best consequence for images with a constantly colored background.
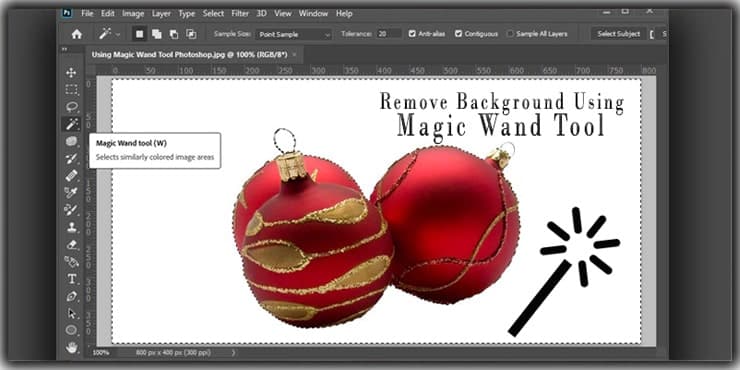
This step-by-stride tutorial teaches how to remove the background using the Photoshop magic wand tool.
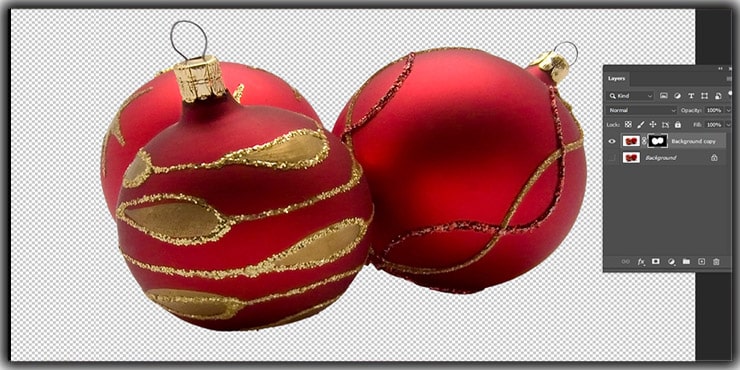
Footstep 01: Selecting the Image
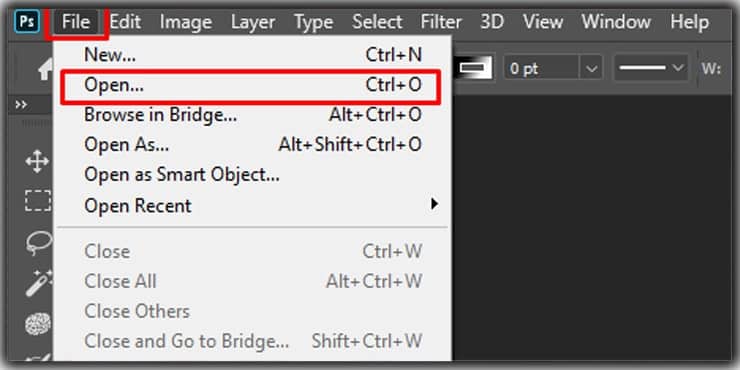
Opening information technology in Photoshop and Making a Duplication Layer of the Background Layer. In Photoshop CC, go to the File option at the top of the Carte Bar, select Open and cull the image that will be Edited.
Once the paradigm is opened in Photoshop CC 2020, the Layer console must be opened by selecting Window > Layer.
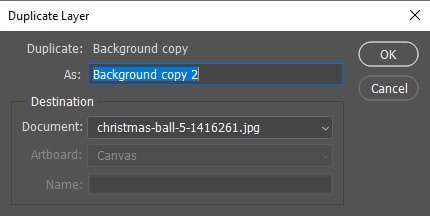
Don't forget to highlight the Background Layer at this phase. Now brand a duplication of the groundwork layer. To do so, select Layer>Indistinguishable Layer
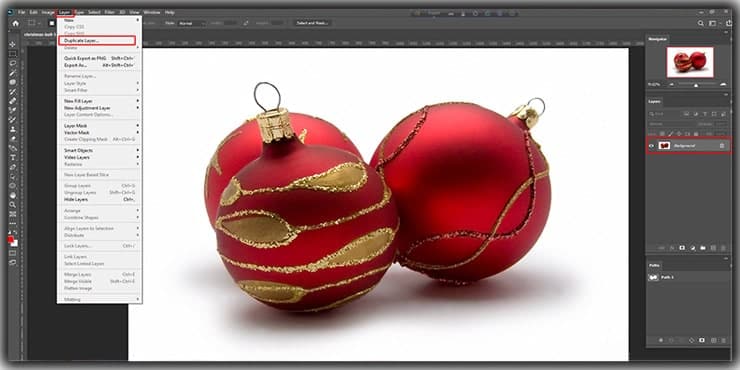
You have to give a customized name to the duplicated layer. Providing a name to the Duplicated Layer ensures the removal of the Background Layer. As a result, you or your team member can hands access and use the file in the future.
Stride 02: Groundwork Layer Hiding
Before starting the image editing, it volition be significantly useful if yous hibernate the Original Background Layer. This fashion, distraction will not happen when working in the duplicate Layer.
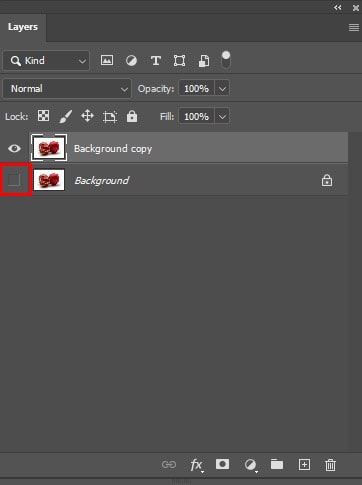
Await at the left portion of the image thumbnail in the Layer Palette, and you will run across an eye icon. Click on it to hibernate the Original Background Layer.
Step 03: Configure Photoshop Magic Wand Tool
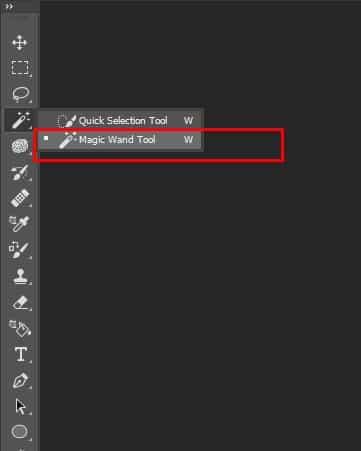
Find the Magic Wand Tool in the Tools Palette. The tools palette is placed on the left side of your computer screen.
Or select the shortcut key "W." If yous don't find the Magic Wand Tool in the Tools palette, be sure it is hidden behind the Quick Selection Tool.
At this signal, click on the Quick Selection Tool and hold it for a few seconds. The Magic Wand Tool will appear, and y'all can select information technology then.
After selecting the Magic Wand Tool, with the help of a few Magic Wand Tools Parameters, you can control the maximum and minimum selection level at a time.
At the upper portion of your computer screen, you will find the adjusting options on the Magic Wand Tools working process.
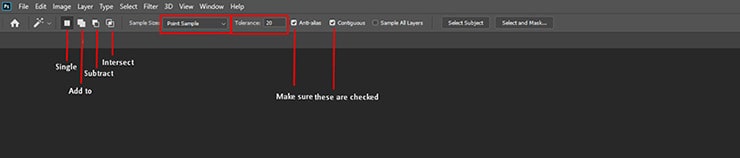
Single-Choice
If you are using the Magic Wand Tool for the first time, this selection needs to be selected.
Add to Selection
This choice is automatically attainable if y'all printing and hold the "Shift" key when working with Magic Wand Tool.
Subtract from Selection
With the help of this option, removing pixels becomes accessible from your selection while you click on your selection area.
Intersect with Pick
The new selection gets created in this pick, including previous selection pixels.
Sample Size
Adjusting the sample size is available in the newer version of Photoshop. Magic Wand Tool can select just 1 color pixel at in one case, which is its default characteristic.
If you control the magic wand tool to increase the sample size, it will boilerplate the pixel color around the sample into its selection criteria.
Tolerance
You lot can't practice it to select a larger area at once without adjusting the Magic Wand Tool Tolerance. Information technology would be best if you decide to continue the Tolerance range between 15 – thirty. The tolerance level is 20 in our instance image.
Pace 04: Making the Selection
There are 2 methods of selecting using the Magic Wand Tool.
Method 01: Background Selection
Method 02: Subject field Selection
Depending on the image'due south background colour, you have to option any method from the higher up. However, we will discuss both Methods for your meliorate understanding.
Method 01: Background Option
Does your paradigm have a solid-colored background? If yeah, so you can select the groundwork using the Magic Wand Tool. And so you accept to brand Inverse to the pick.
- Information technology is significantly essential not to practise whatsoever piece of work in the Original Layer. And then, select the duplicate Layer to accomplish your piece of work.
- Select the Magic Wand Tool, and click on any portion of the epitome per your preference.
- Now press and concur the Shift key. At this signal, don't forget to click on background areas that are not being selected at the initial phase—for example, the orangish shadows.
- So press Shift + Ctrl + I (for Windows), Shift + Command + I (for Mac). This volition allow you to select Inverse, or the bailiwick will become selected.
Method 02: Subject Selection

You may need to piece of work on images where the groundwork comes with multiple colors.
Photoshop CC 2020 has an advanced characteristic named Select Subject. This feature will aid yous in selecting the image. Fifty-fifty the most intricate epitome can easily exist selected with this feature.
- Confirm to do the editing work in the indistinguishable Layer.
- At present, choose the Magic Wand Tool and do not click on any image portion.
- Click on the Select Subject area push at the top of the application. You will so accept a crude selection of the subject area.
- You will find Subtract from Choice option at the top of the screen. Next is to click on any portion of the image except the bailiwick, such as the subject'south shadow. This will ensure that these areas will be out of pick while editing the epitome.
Now one question might take popped upward in your mind.
Can I use the Magic Wand Tool if I have an older version of Photoshop?
Yous can. Merely there will be some limitations. Selecting the subject area will not exist an issue using the Magic wand tool in the older version of Photoshop.
For this, the background has to exist a circuitous 1 and a one-colored subject. To select the discipline, you take to follow Method 01.
The key difference is; that you will non be able to select the Inverse after finalizing the selection.
Pace 05: Refining the Selection Edges
Side by side, you will need to cull an option named Select and Mask… positioned at the Select Field of study option's correct side.
In the older version of Photoshop, y'all will have this option every bit follows Select > Refine Edge.

Now a new window volition appear. You will find a serial of global controls on the right side, and Spot Adjustment Tools will announced on the left side.
Select the View button from the Backdrop tab at the top right corner. Select the button and if On Layers (Y) is not selected, select it. Don't forget to do it.
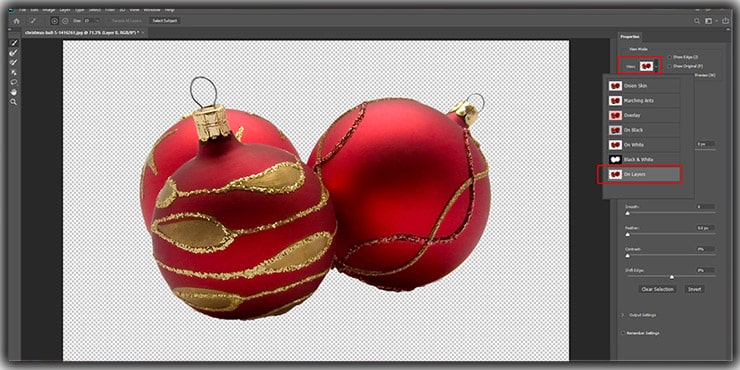
At present you will encounter an isolated subject that doesn't have a background.
You can play with the features at this stage, simply nosotros volition non employ different features. Underneath Global Refinements, in that location is an option named Polish office, and to the left of the screen, there is the Refine Border Brush tool. We will take assistance from these two features.
To smoothen any rough edges of the subject, drag the Smooth slider to the correct side.
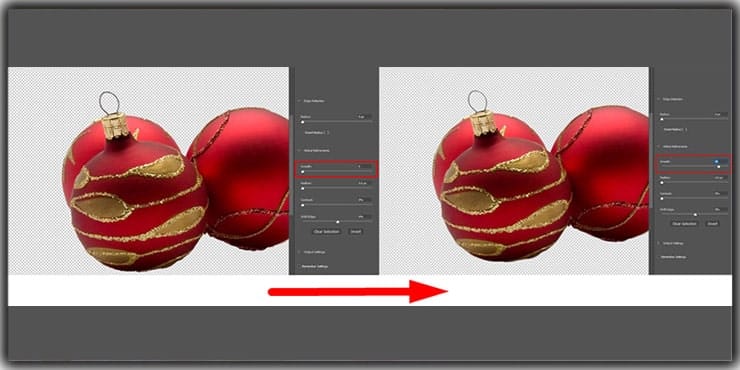
Now click R to get access to the Refine Edge Tool. This feature volition allow you to spot any specific areas of the photo. Using this tool is uncomplicated. First, select the tool, and paint over the selection area where refinement is needed.
In one case you terminate refining as per your requirement, get to the Output Setting in the lower right corner of your computer screen. From at that place, choose Output to Layer Mask and and then hit OK.
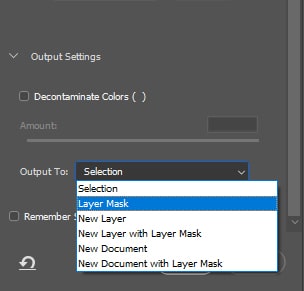
Now the field of study is entirely isolated from the groundwork by applying the Layer Mask pick.
Stride 06: Applying New Background
We are at the final stage of this tutorial.
You must have a preferred prototype you want to utilise as a background in your editing image.
First, open the file of the groundwork image.Press Ctrl + A to select the unabridged image.
Then press Ctrl + C to copy information technology.
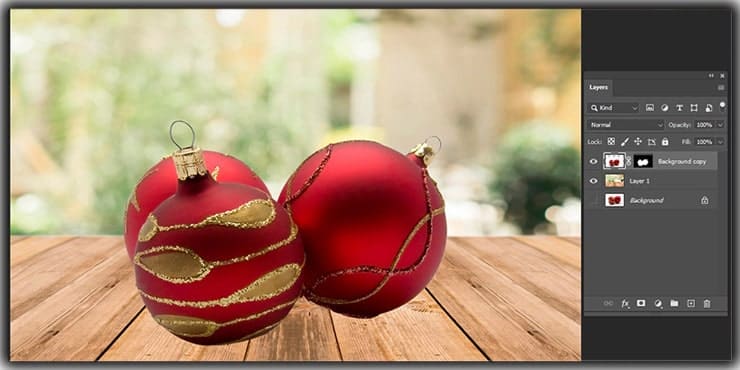
Now become to the file that contains the isolated subject. First, the unaltered groundwork needs to select. Then press Ctrl + 5 to paste the groundwork image into the isolated subject area file.
A new layer (with new background) will appear in the Layer palette between the original background and duplicate background. Now click on the middle icon of the original background to brand it visible again.
If your original image's background is white, it volition help if yous decide to select the blend mode to multiply the new groundwork image. As a effect, y'all can drag the actual shadow back to the new image.
Adding more layers as an additional background is likewise possible. And by toggling the center icon, you can meet how the epitome volition appear with a different background.
Afterwards creating layers, fill them upward with solid colors to see your subject against a groundwork that comes with a solid colour option.

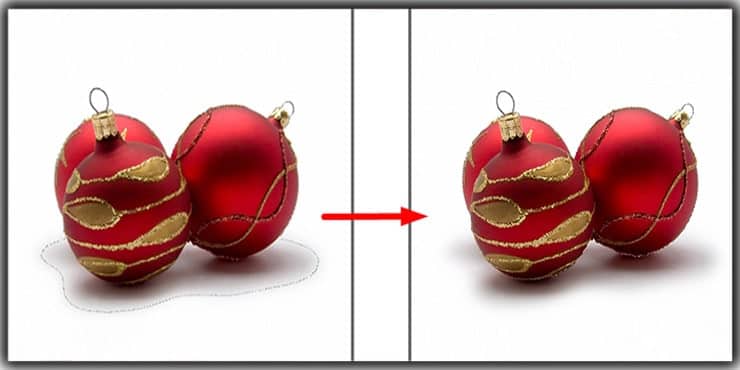
Product photographers and eCommerce sellers commonly apply magic Wand Tools. Following this technique, yous can remove an prototype groundwork and supervene upon the sky or any without any hassle. Moreover, It helps to remove the white background hands.
Below are a few scenarios about when to utilise the magic wand tool in an image.
- You tin can show your production in different environments. Your customer tin can see your product against a familiar and beautiful groundwork. Information technology will help y'all to better customer engagement also as product sales.
- With this technique, you don't need to modify the settings of your original image. You can change your product'southward shape, size, and background without affecting the original image. This means that capturing multiple images is unnecessary, while y'all can change the background as per your requirement with the Magic Wand Tool.
- Nearly 3rd party marketplaces such as Amazon, Alibaba, and eBay want product advertisements with white backgrounds. Magic Wand Tool allows a person to change the image's background to white. Afterward making your production epitome with a white background, you can list your product on those 3rd party marketplaces without whatever trouble.
You volition face the claiming of using the magic wand tool in a few images. While using information technology in other images volition non give you much trouble. With a couple of easy tips and tricks, y'all will be able to go great images.
Follow the above step-by-stride guidelines on replacing or removing an image background using the magic wand tool and give your epitome a beautiful look.
You may Read:
- How to Create a Clipping Path in Photoshop
- How to Remove All of One Color in Photoshop in ii Minutes
- How to Use Background Eraser Tool in Photoshop CC
- Photoshop Pen Tool Tutorial | Create a Clipping Path
- How to Edit Photos in Photoshop

How To Remove Background Photoshop Magic Wand,
Source: https://graphicexpertsindia.com/remove-background-using-magic-wand-tool-photoshop/
Posted by: broomfife1996.blogspot.com
0 Response to "How To Remove Background Photoshop Magic Wand"
Post a Comment